Schwabenmax Einbauanleitung Heckhöherlegung für Modell:K1200R ,
Sport,K1200S, K1300R, K1300S
Schwabenmax
installation instructions rear lift for model:K1200R , Sport,K1200S,
K1300R, K1300S
Bitte beachten Sie diese Anbauanleitung um jedweden Fehler zu
vermeiden !
Vorraussetzung für eine fehlerfreie Montage ist das passende Werkzeug,
technisches Verständnis und etwas Feingefühl. Sie benötigen keine Schlagwerkzeuge Brecheisen und keinerlei
Gewaltakte !!!
Wir empfehlen den Einbau in einer Fachwerkstatt durchführen zu lassen
Einbauzeit je nach Gegebenheit 30- 60 Minuten.
Please follow these installation
instructions to avoid any errors!
Prerequisite for a
faultless installation is the right tool, technical understanding and
a little sensitivity.
You do not need any impact tools, crowbars
or any kind of force !!!
We recommend having the installation carried
out in a specialised workshop!
Installation time 30-60 minutes depending on
conditions.
1. Motorrad sicher auf den Hauptständer stellen.
Falls kein Hauptständer vorhanden ist, Motorrad auf eine sichere
Haltevorrichtung stellen.
1. place the motorbike securely on the
centre stand.
If there is no centre stand, place the motorbike on a secure holding
device.
Achtung: Nicht am Hinterrad ( Achse ) mittels
einer Aufbockvorrichtung anheben !
Caution: Do not lift by the rear wheel
(axle) using a jacking device
1:
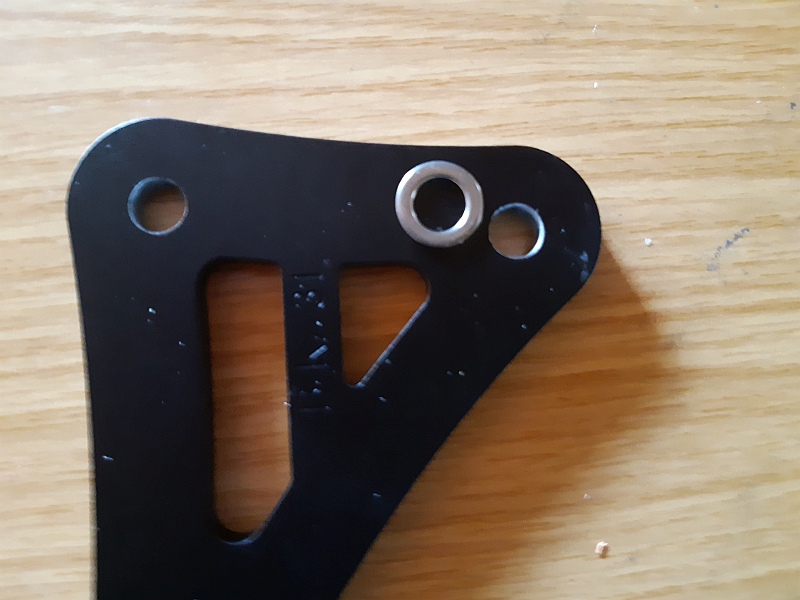
Lieferumfang: Platten rechts und links, 6x U Scheiben, 6x
Passcheiben.
Die U Scheiben aussen passend in die Senkung legen.
Innen die 1 mm
Passscheiben zwischen die Platten und die Lagerhülse legen,
siehe Abbildung.
1:
Scope of delivery:
Plates right and left, 6x U-discs, 6x shims.
Place the U washers in the countersink on
the outside.
Place the 1 mm shim discs on the inside
between the plates and the bearing sleeve, see illustration.

2.
Mit geeignetem Werkzeug die Muttern der original Halteplatten
entfernen ( rechts )
Rechte Platte abnehmen, mit einem kleinen Gummi oder Kunststoffhammer
die überstehenden Schrauben von rechts durch klopfen und links
herausziehen.
2.
Use a suitable tool to remove the nuts from the original
retaining plates ( right )
Remove the right-hand plate, use a small
rubber or plastic hammer to tap the protruding screws from the right
and pull them out on the left.
Achtung ! Nicht die Lagerhülsen mit
herausziehen !
Attention ! Do not pull out the bearing
sleeves!
3.
Nutzen Sie die Gelegenheit und fetten sie mit geeignetem Lagerfett
die 3 Nadellager wie folgt:
Schieben Sie von einer beliebigen Seite die Lagerhülsen ca. 2/3 heraus
und schmieren Sie Lagerfett in das freigelegte Lager.
Anschließend wiederholen Sie den Vorgang von der anderen Seite
3
Take the opportunity to grease the 3
needle bearings with suitable bearing grease as follows:
Push out the bearing sleeves approx. 2/3
from any side and lubricate the exposed bearing with bearing grease.
Then repeat the process from the other side
Achtung !
Wenn Sie die Lagerhülsen ganz herausziehen
besteht die Gefahr das die Nadeln des Lagers heraus fallen !
Attention !
If you pull out the bearing sleeves completely, there is a
risk that the needles of the bearing will fall out !
4.
Montieren Sie nun von der linken Seite die Schwabenmax Umlenkplatte
wie folgt, am besten mit einer Hilfsperson zum anheben des Hinterrads.
4/1. Die 3 original Schrauben vor der Montage einfetten, nicht
die Muttern!
4/2. Platte dranhalten die vordere Schraube komplett durchstecken.
4/2. Platte dranhalten und die hintere Schraube komplett
durchstecken.
4.
Now mount the Schwabenmax
deflection plate from the left side as follows, preferably with an
assistant to lift the rear wheel.
4/1. Grease the 3 original bolts before
fitting, not the nuts!
4/2. Hold the plate in place and push the
front bolt all the way through.
4/2. Hold the plate in place and insert the
rear bolt all the way through.

4/3 Den Umlenkhebel ( Knochen ) passend auf die 3. Haltebohrung
bringen,
dazu das Hinterrad anheben, die Schraube durchstecken das sie auf der
Rückseite nicht übersteht.
4/3 Position the deflection lever (
bone ) to fit the 3rd retaining hole,
lift the rear
wheel, insert the screw so that it does not protrude at the rear.
4/4. Die rechte Platte aufstecken und die Muttern einige
Umdrehungen per Hand anziehen.
4/4 Attach the right-hand plate and tighten
the nuts a few turns by hand.
4/5. Achtung die Haltebohrungen sind exakt auf 10mm gebohrt( Serie 10,2 -10,3 ))
4/5. Attention: the retaining holes are
drilled exactly to 10 mm
( series 10.2 -10.3 )
Dadurch muss bei der Montage der 3 Schraube die Bohrung exakt
fixiert werden.Die Schraube lässt sich per Hand saugend montieren !!
This means that the hole must be fixed
precisely when fitting the 3 screws.
The screw can be fitted by hand using
suction!
Bitte keine Gewalt
anwenden, arbeiten Sie bitte mit Feingefühl , ein Hammer oder anderesBitte keine Gewalt
anwenden, arbeiten Sie bitte mit Feingefühl , ein Hammer oder anderes
Schlagwerkzeug ist
nicht notwendig !!
Please do not use force, please work
with sensitivity, a hammer or other
impact tool is not necessary!
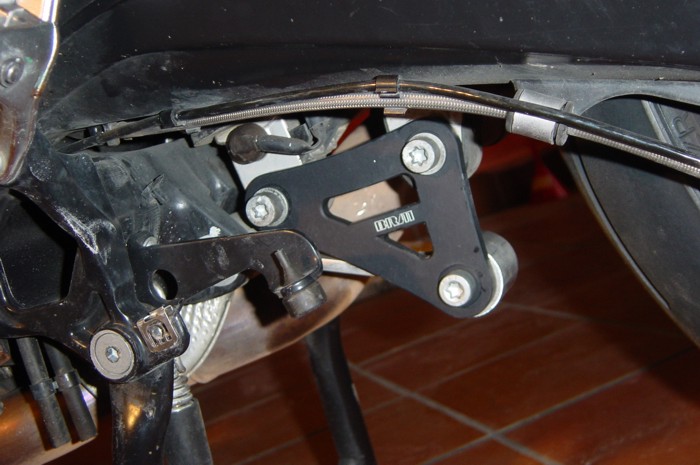
4/6. Wenn alle 3 Haltebolzen richtig montiert sind nehmen Sie
die orig. Muttern ab, entfetten Sie das überstehende Gewinde
bringen Sie etwas Loktide Schraubensicherung
in die Muttern ein, schrauben Sie die Muttern gleichmäßig fest.
4/6 When all 3 retaining bolts are correctly
fitted, remove the original nuts, degrease the protruding thread,
apply some Loktide threadlocker to the nuts and tighten the nuts
evenly.
Anzugsdrehmoment laut
BMW - Werkstatthandbuch 38 Nm. Bild 4
Tightening torque according to BMW workshop
manual 38 Nm. Figure 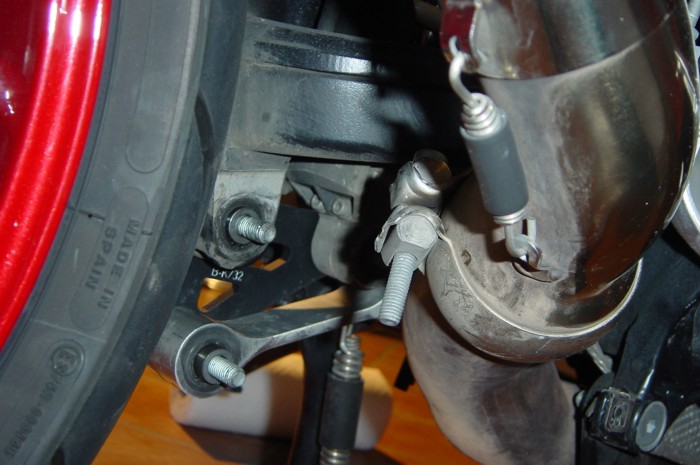
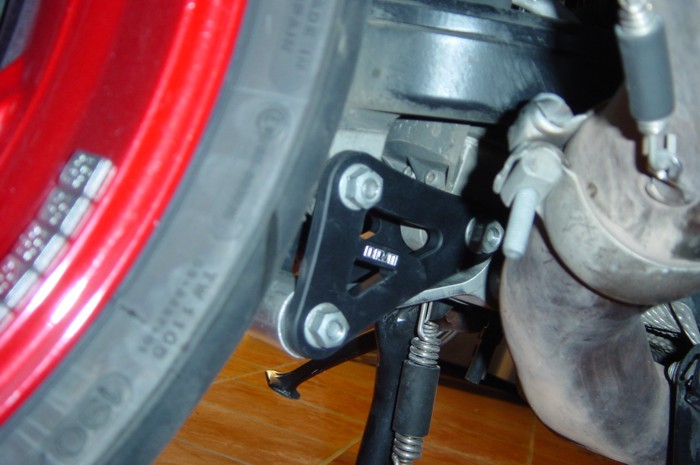
Bild 4
4/7.
Nach fertiger Montage der Heckhöherlegung den Scheinwerfer neu
einstellen.
4/7.
Once the rear lift has been installed,
readjust the headlight.
Achtung:
Durch unsere Heckhöherlegung verändern sich
die Sitzposition / Bodenfreiheit im Bereich der Fahrerraste um ca.
17,5 mm bis 26,5 mm je nach Variante
Im Weiteren wird Ihr Motorrad durch unsere
Heckhöherlegung im Fahrbetrieb wesentlich handlicher, lenkt williger
ein und reagiert spontaner auf Lenkimpulse.
Gehen Sie im eigenen Interesse mit der
gebotenen Vorsicht an die Sache heran bis Sie sich an das neue Stand
und Fahrverhalten gewöhnt haben !
Wir wünschen Ihnen allzeit
viel Spaß und eine gesunde Heimkehr auf all Ihren Wegen.
Schwabenmax Team
Attention:
Our rear elevation system changes the
seating position / ground clearance in the area of the rider's
footrest by approx. 17.5 mm to 26.5 mm depending on the variant
Furthermore, our rear elevation system
makes your motorbike much easier to handle when riding, makes it
turn in more willingly and reacts more spontaneously to steering
impulses.
In your own interest, proceed with the necessary caution until you
have become accustomed to the new stance and riding behaviour!
We wish you lots of fun at all times and
a safe return home on all your journeys.
Schwabenmax Team
|